Understanding Wiring Diagrams for Outdoor AC Units
Having an outdoor AC unit provides homeowners with efficient cooling and comfort during the hot summer months. But, in order to install and maintain it, you must understand the wiring diagrams for the unit. This type of diagram is essential for understanding and following the electrical connections that are used to operate the unit. Additionally, it can also be helpful to know how to interpret the symbols that are used in the diagrams.
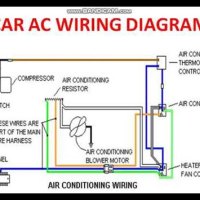
The wiring diagrams for outdoor AC units consist of an electrical diagram and a schematic diagram. The electrical diagram contains all of the information about the components that are used in the unit. This includes the wiring, switches, and other electrical components that are necessary to make the unit operate. The schematic diagram shows how the components are connected to each other. This diagram shows how the electrical power is routed through the system.
Components and Symbols in Wiring Diagrams of Outdoor AC Units
When looking at wiring diagrams for outdoor AC units, it’s important to understand the components and symbols that are used in the diagrams. Some of the most common components include:
- Power source
- Circuit breaker
- Thermostat
- Air handler
- Condenser
- Evaporator coil
- Compressor
- Fan motor
- Reversing valve
- Transformer
Each one of these components has its own set of symbols that are used to represent it in the wiring diagrams. For example, the power source is represented by a circle with a line in the middle, the circuit breaker is represented by a rectangle with a line in the middle, and the thermostat is represented by a triangle with a line in the middle. Additionally, there are other symbols that are used to represent other components such as the air handler, condenser, evaporator coil, compressor, fan motor, reversing valve, and transformer.
Tips for Reading Wiring Diagrams for Outdoor AC Units
Reading wiring diagrams for outdoor AC units can be a challenging task for those who are unfamiliar with the diagrams. However, with some practice and understanding of the various components and symbols, it’s possible to become proficient in reading and interpreting the diagrams. Here are some tips that can help you understand these diagrams:
- Read the diagram carefully and take your time when interpreting the different components and symbols.
- Make sure that you understand the purpose of each component before attempting to install or troubleshoot any issues.
- Pay attention to the color coding of the wires. This will help you identify which wires go where.
- Check the wiring diagrams periodically to ensure that all of the components are connected correctly.
- If you have any questions about the wiring diagrams, consult an experienced professional for help.
By following these tips, you can become more familiar with the wiring diagrams for outdoor AC units and be better prepared to install and maintain your unit. With the right knowledge and understanding, you can ensure that your unit runs efficiently and effectively.

Electrical Air Conditioner System Diagram Source Scientific

Hvac Start And Run Capacitor Explained Replacement How To

Electrical Specs For Installing Ductless Mini Splits Hvac Units

Trane Ac 3 Phase Wiring Diagram Fully4world

Electrical Specs For Installing Ductless Mini Splits Hvac Units

Ac Capacitor Wiring Diagram And Connection Procedure Etechnog

Lg Hmc024wa Air Conditioner Wiring Diagram Manualzz

Ac Capacitor Wiring Diagram And Connection Procedure Etechnog

Outdoor Unit Features Zamil Air Conditioners Manualzz

Ac Wiring Diagram App Electrical System For Android

Air Conditioner Connection And Wiring Diagram Etechnog

Lg Ac Wiring Diagram Fully4world

Split Ac Outdoor Fan Motor Connection Doityourself Com Community Forums

Diagram Ac Wiring Split 1 0 For Android

Condenser Unit Fan Stopped Running Diagnosis Repair For Air Conditioners Heat Pumps

Service Manual

Wiring Diagram For Control Air Cooled Split Type Ac Unit Free Cad Block And Drawing

Service Maintenance Manual Pdf Free